One of the first concepts every Fusion 360 user encounters is the difference between Components and Bodies. At first glance, they seem similar because both represent 3D geometry. However, they serve very different purposes in the design process.
Many beginners create entire projects using only bodies, only to run into problems when they need to assemble parts, apply joints, create motion, or generate manufacturing drawings. Understanding when to use a body and when to create a component is one of the most important steps toward becoming an efficient Fusion 360 user.
- What bodies are
- What components are
- The differences between them
- When to use each
- Common beginner mistakes
- Best practices for mechanical design
By the end of this article, you'll know how to organize your Fusion 360 projects like a professional mechanical designer.
What Is a Body?
A Body is a solid piece of geometry that represents the physical shape of a part.
Think of a body as the material you've created using features such as:
- Extrude
- Revolve
- Sweep
- Loft
- Hole
- Fillet
- Chamfer
Bodies define the geometry but do not contain assembly intelligence.
Example
If you're designing a simple mounting bracket, the bracket itself is a body. Similarly, a gear, a flange, a pulley, a wheel, or a base plate can each exist as individual bodies.
Characteristics of Bodies
- Store solid geometry
- Can be edited using modeling features
- Can be combined or split
- Exist inside a component
- Cannot have joints directly applied
- Share the same origin as their parent component
Bodies are ideal for modeling individual shapes quickly.
What Is a Component?
A Component is an organized container that holds one or more bodies along with additional design information.

A component can include:
- Bodies
- Sketches
- Construction geometry
- Joints
- Parameters
- Origins
- Manufacturing information
Unlike bodies, components behave like real mechanical parts.
Think of It This Way
Imagine designing a bicycle. The bicycle contains a frame, wheels, pedals, chain, and handlebars. Each of these should be a Component. Inside each component are one or more Bodies that define its shape.
Components Represent Real Parts
Every manufactured part should usually become its own component. Examples include shafts, bearings, housings, brackets, bolts, nuts, pulleys, and gears. Each part can move independently inside an assembly.
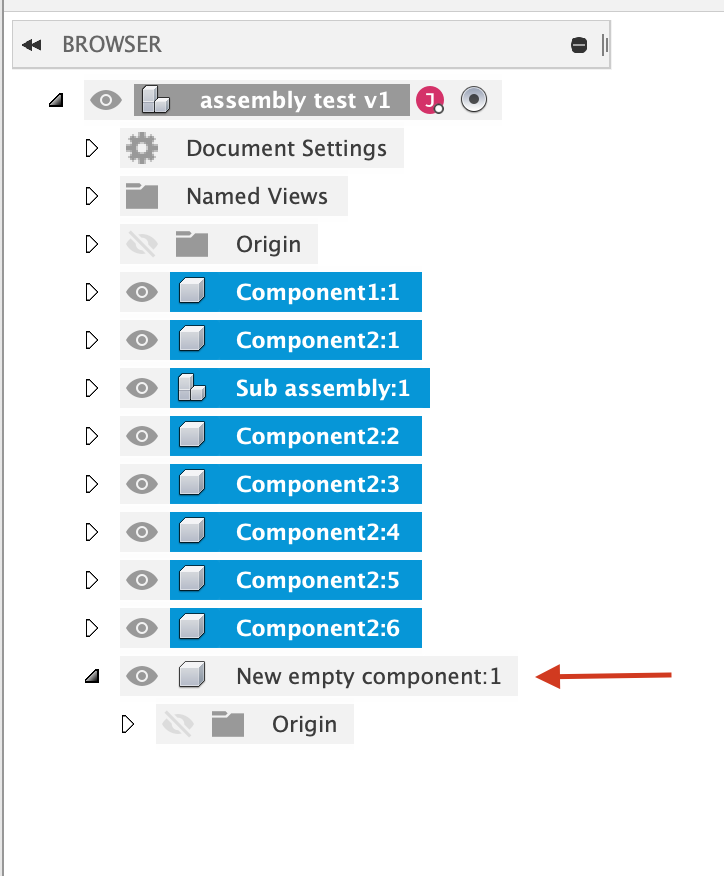
Bodies vs Components
| Feature | Body | Component |
|---|---|---|
| Stores Geometry | ||
| Contains Sketches | ||
| Has Its Own Origin | ||
| Supports Joints | ||
| Can Move Independently | ||
| Used in Assemblies | Limited | |
| Manufacturing Drawings | Limited | |
| Best For | Modeling Shapes | Mechanical Parts |
Why Components Are Important
Suppose you're designing a gearbox that includes a housing, input shaft, output shaft, bearings, gears, cover plate, and bolts.
- Nothing can rotate.
- No motion can be added.
- Drawings become difficult.
Instead, create each part as its own component. Now you can:
- Apply joints
- Rotate gears
- Animate mechanisms
- Generate BOMs (Bill of Materials)
- Create assembly drawings
Real-World Mechanical Example
Let's design a simple bench vise. The bench vise contains a fixed jaw, moving jaw, lead screw, handle, and base. Each of these is a Component. Inside each component may be one or more bodies. This structure mirrors how the product is manufactured and assembled.
When Should You Use Bodies?
Bodies are perfect for:
- Learning Fusion 360
- Single-part designs
- Simple prototypes
- Concept models
- Decorative models
- One-piece 3D printed parts
Examples: Phone stand, nameplate, bottle opener, machine bracket, mounting plate.
When Should You Use Components?
Components should be used whenever:
- Parts move relative to one another
- An assembly is required
- Multiple manufactured parts exist
- Joints will be added
- Motion studies are needed
- Drawings are created
- BOMs are generated
- CAM operations require separate parts
Multi-Body Design
Fusion 360 also supports multi-body modeling. For example, if you create a base plate, ribs, and bosses, initially these are separate bodies. Later, you can convert them into components as your design evolves.
How to Convert Bodies into Components
Fusion 360 makes conversion easy:
- Open the Browser.
- Expand Bodies.
- Right-click the desired body.
- Select Create Components from Bodies.
Fusion 360 creates a new component while preserving the geometry.
Browser Organization
A well-organized Browser improves productivity.
Instead of this:
Body1
Body2
Body3
Body4
Aim for:
Base
Body
Shaft
Body
Gear
Body
Cover
Body
This structure is much easier to manage.
Assembly Example
Imagine designing a centrifugal pump with components including an impeller, shaft, bearing, housing, cover, and fasteners. Each component can rotate, move, be replaced, or be manufactured separately. Bodies alone cannot provide this flexibility.
Common Beginner Mistakes
- Creating Everything as Bodies: This is the most common mistake. As projects become larger, editing becomes difficult.
- Ignoring Components Until the End: Waiting until the project is complete to organize components creates unnecessary work.
- Naming Bodies "Body1": Always rename parts with meaningful terms like
Gear,Shaft,Housing, orCover. - Mixing Unrelated Parts: Don't model unrelated mechanical parts inside one component. Separate them properly.
- Forgetting Assembly Planning: Always ask yourself: "Will this part move independently?" If yes, create a component.
Best Practices
- Start with components for every manufactured part.
- Keep bodies inside the correct component.
- Rename components clearly.
- Use joints instead of moving bodies manually.
- Keep the Browser organized.
- Create assemblies that match real manufacturing.
- Think like a mechanical engineer—not just a CAD user.
Real-World Workflow
Professional engineers usually follow this process:
- Create a new component.
- Sketch the profile.
- Build the body.
- Add features.
- Create additional components.
- Assemble components.
- Apply joints.
- Test movement.
- Generate drawings.
- Manufacture the design.
Frequently Asked Questions (FAQ)
Can a component contain multiple bodies?
Yes. A component can contain one or more bodies, depending on the design.
Can bodies move independently?
No. Bodies cannot be joined or moved independently like components within an assembly.
Should every body become a component?
Not necessarily. For a single-part design, multiple bodies may remain within one component. For assemblies or moving parts, separate components are recommended.
Can I convert bodies into components later?
Yes. Right-click the body in the Browser and choose Create Components from Bodies.
What is better for beginners?
Start with components whenever you're designing a product made of multiple parts. It helps establish good habits and makes future modifications easier.
Key Takeaways
- Bodies store solid geometry.
- Components represent individual parts in an assembly.
- Components can contain sketches, bodies, origins, joints, and parameters.
- Use Bodies for simple part modeling.
- Use Components for assemblies and moving parts.
- Organize your Browser with meaningful names.
- Plan your design structure before modeling.
Ready to Master Fusion 360?
Take your skills beyond the basics with hands-on mechanical projects covering part modeling, assemblies, sheet metal, manufacturing, and real-world engineering workflows.
Enroll in Fusion 360 Mastery Course →